10 - ROS2 Control
Robotics I
Poznan University of Technology, Institute of Robotics and Machine Intelligence
![]()
Laboratory 10 - ROS2 Control
Goals
By the end of this lab you will:
- Understand the ROS2 Control Framework.
- Configure and launch controllers for simulated hardware.
- Interact with controllers using command-line tools.
- Visualize and control a simulated
robotic system using RViz2 and
ros2_control_demos.
Resources
Note: All code must run inside Docker container.
Preparation
- Pull the latest version of the ROS2 Jazzy Docker image:
docker pull osrf/ros:jazzy-desktopRun the Docker container with the following script.:
Note: Make sure to replace
CONTAINER_NAMEwith your student ID number.
  IMAGE_NAME="osrf/ros:jazzy-desktop"
  CONTAINER_NAME="" # student ID number

  xhost +local:root

  XAUTH=/tmp/.docker.xauth
  if [ ! -f $XAUTH ]
  then
      xauth_list=$(xauth nlist :0 | sed -e 's/^..../ffff/')
      if [ ! -z "$xauth_list" ]
      then
          echo $xauth_list | xauth -f $XAUTH nmerge -
      else
          touch $XAUTH
      fi
      chmod a+r $XAUTH
  fi

  docker stop $CONTAINER_NAME || true && docker rm $CONTAINER_NAME || true

  docker run -it \
      --env="DISPLAY=$DISPLAY" \
      --env="QT_X11_NO_MITSHM=1" \
      --env="ROS_AUTOMATIC_DISCOVERY_RANGE=LOCALHOST" \
      --env="ROS_LOCALHOST_ONLY=1" \
      --volume="/tmp/.X11-unix:/tmp/.X11-unix:rw" \
      --env="XAUTHORITY=$XAUTH" \
      --volume="$XAUTH:$XAUTH" \
      --privileged \
      --network=host \
      --shm-size=1024m \
      --name="$CONTAINER_NAME" \
      $IMAGE_NAME \
      bash
After running the above command, you should be inside the container. Now let’s configure the environment:
apt update
apt install python3-pip ros-jazzy-ros2-control ros-jazzy-ros2-controllers ros-jazzy-ros2-control-cmake ros-jazzy-joint-state*
echo "source /opt/ros/jazzy/setup.bash" >> ~/.bashrc
mkdir -p ~/ros2_ws/src
cd ~/ros2_ws/src
git clone -b jazzy https://github.com/ros-controls/ros2_control_demos.git
cd ~/ros2_ws
source /opt/ros/jazzy/setup.bash
rosdep update
rosdep install --from-paths src --ignore-src -r -y
colcon build
source ~/ros2_ws/install/setup.bash
echo "source ~/ros2_ws/install/setup.bash" >> ~/.bashrc
Tip: You can use
colcon build --symlink-installto create symbolic links to the source files instead of copying them. This way, you can edit the source files directly in thesrcdirectory without needing to rebuild the entire workspace.
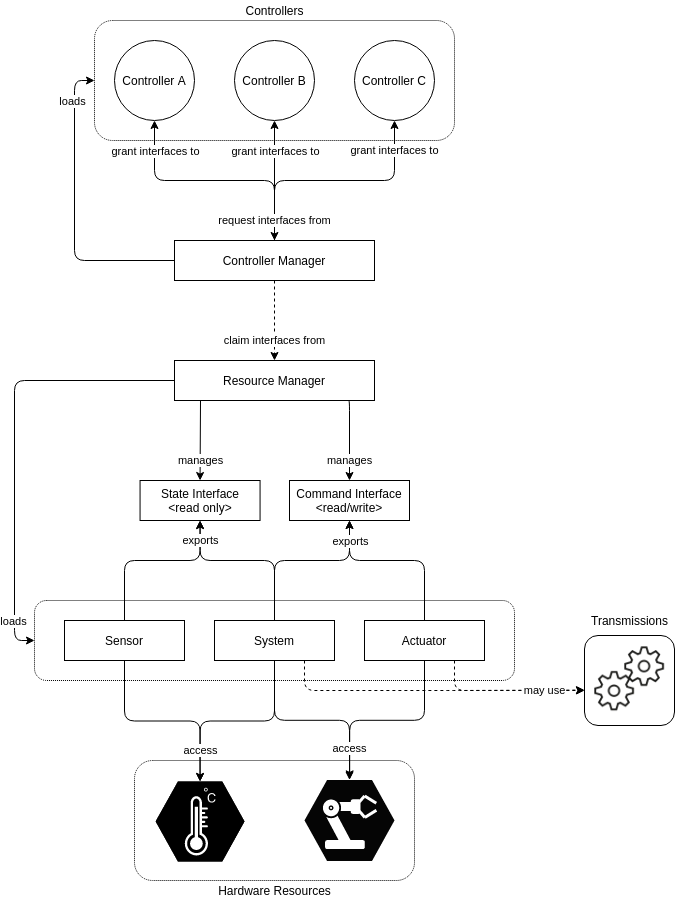
ROS2 Control Overview
ROS2 Control is a modular framework designed to simplify the integration of robot hardware with control algorithms. It abstracts away the complexities of directly managing motors, sensors, and actuators, allowing developers to focus on higher-level control logic.
Instead of writing low-level code for every hardware component, you define hardware interfaces and use standardized controllers to operate them. These components are managed by the Controller Manager, which handles starting, stopping, and switching between controllers at runtime.
Key Concepts
Hardware Interface:
Represents the robot’s physical or simulated hardware, such as motors, sensors, and actuators. It abstracts the low-level control by exposing standardized interfaces (e.g., position, velocity, or effort commands).Controllers:
Software modules that implement specific control strategies (e.g., position control, velocity control, or trajectory following). Instead of hardcoding control logic, you configure and load existing controllers likeforward_command_controllerorjoint_trajectory_controller.Controller Manager:
A central ROS2 node that manages the lifecycle of controllers. It allows starting, stopping, and switching between controllers dynamically without restarting the system.Command and State Interfaces:
- Command Interfaces provide mechanisms to send commands to
actuators (e.g., set a joint’s position).
- State Interfaces provide feedback from the hardware (e.g., current joint positions or velocities).
- Command Interfaces provide mechanisms to send commands to
actuators (e.g., set a joint’s position).
Why Use ROS2 Control?
Hardware Abstraction:
Develop control logic once and use it with both real robots and simulations like Gazebo without changing your code.Dynamic Controller Switching:
Change control strategies during runtime, allowing flexible behavior (e.g., switching from position control to impedance control).Ecosystem of Controllers:
ROS2 Control comes with a library of pre-built controllers for common tasks, reducing the need to write custom control code.Standardized Tools:
Provides powerful CLI and visualization tools to monitor and interact with your controllers and hardware.
ROS2 Control Architecture
Task 1: Launch a Simulated Robot with ROS2 Control
- Launch the RRBot example and play with the GUI:
ros2 launch ros2_control_demo_example_1 view_robot.launch.py- Kill the GUI and launch the RRBot model in RViz for visualization.
ros2 launch ros2_control_demo_example_1 rrbot.launch.py- List controllers available in the system:
ros2 control list_controllersThis will list the controllers loaded for RRBot.
- Send position commands to the RRBot using the
forward_command_controller:
ros2 topic pub /forward_position_controller/commands std_msgs/msg/Float64MultiArray "data: [1.0, 0.5]"Expected Outcome: Observe RRBot’s joints moving to the specified positions in RViz.
Differential Drive Robot Control
- Launch the differential drive robot simulation:
ros2 launch ros2_control_demo_example_2 diffbot.launch.py- Check if the hardware interface loaded properly, by opening another terminal and executing
ros2 control list_hardware_interfacesThe [claimed] marker on command interfaces means that a
controller has access to command DiffBot.
Furthermore, we can see that the command interface is of type velocity, which is typical for a differential drive robot.
- Check if controllers are running
ros2 control list_controllers- If everything is fine, now you can send a command to Diff Drive Controller using ROS 2 CLI interface:
ros2 topic pub --rate 10 /cmd_vel geometry_msgs/msg/TwistStamped "
twist:
  linear:
    x: 0.7
    y: 0.0
    z: 0.0
  angular:
    x: 0.0
    y: 0.0
    z: 1.0"
You should now see an orange box circling in RViz. Also, you should see changing states in the terminal where launch file is started.
[ros2_control_node-1] [INFO] [1721762311.808415917] [controller_manager.resource_manager.hardware_component.system.DiffBot]: Writing commands:
[ros2_control_node-1]   command 43.33 for 'left_wheel_joint'!
[ros2_control_node-1]   command 50.00 for 'right_wheel_joint'!
Task 3: 6DOF robot
URDF
The URDF (Unified Robot Description Format) is an XML format used to represent a robot model in ROS. It describes the robot’s physical structure, including links, joints, sensors, and other components. The URDF file is essential for simulating and visualizing the robot in tools like RViz and Gazebo. To preview the full URDF file of 6DOF robot, you can use the following command:
xacro ~/ros2_ws/src/ros2_control_demos/example_7/description/urdf/r6bot.urdf.xacro > r6bot.urdf
urdf_to_graphiz r6bot.urdf
This will generate a PDF file in the current directory. You can open (for example copy to host) this file to visualize the robot’s structure and joints.
Launching the 6DOF Robot
- Launch the 6DOF robot simulation:
ros2 launch ros2_control_demo_example_7 view_r6bot.launch.pyPlay around with the GUI and see how the robot moves.
- Launch the 6DOF robot controller:
ros2 launch ros2_control_demo_example_7 r6bot_controller.launch.py- In new terminal, run the following command to send trajectory to the robot:
ros2 launch ros2_control_demo_example_7 send_trajectory.launch.pyYou should see the tutorial robot making a circular motion in RViz.
Carlike Robot
Why Steering a Carlike Robot Without ROS2 Control is Challenging
Controlling a carlike (Ackermann steering) robot directly, without the abstraction provided by ROS2 Control, requires you to manually handle low-level hardware communication, kinematic constraints, and synchronization between steering and drive mechanisms. You must implement custom code to translate high-level velocity or steering commands into precise wheel angles and speeds, taking into account the robot’s geometry and physical limitations. This process is error-prone and makes it difficult to switch between simulation and real hardware, as each platform may require different drivers and interfaces. ROS2 Control simplifies these challenges by providing standardized interfaces, reusable controllers, and seamless integration with simulation tools, allowing you to focus on higher-level behaviors rather than hardware-specific details.
Launching the Carlike Robot
- Launch the carlike robot simulation:
ros2 launch ros2_control_demo_example_11 carlikebot.launch.py remap_odometry_tf:=true- In a new terminal, run the following command to list the hardware interfaces:
ros2 control list_hardware_interfaces- Run the following command to list the controllers:
ros2 control list_controllers- If everything is fine, now you can send a command to bicycle_steering_controller using ROS 2 CLI:
ros2 topic pub --rate 30 /bicycle_steering_controller/reference geometry_msgs/msg/TwistStamped "
  twist:
    linear:
      x: 1.0
      y: 0.0
      z: 0.0
    angular:
      x: 0.0
      y: 0.0
      z: 0.1"
You should now see an orange box circling in RViz. Also, you should see changing states in the terminal where launch file is started.
Final task: Publishing Trajectories for the Carlike Robot
In this final task, you will write a simple Python script that publishes velocity commands to drive the carlike robot around in simulation.
Steps
Create the Python Script (and new package)
Create a new package in your workspace:
cd ~/ros2_ws/src
ros2 pkg create --build-type ament_python --node-name drive_node drive_carlike
This will create a new package named
drive_carlikewith a Python node nameddrive_node.Script Example
Modify the
drive_node.pyfile in thedrive_carlikepackage.Below is a minimal example that publishes a circular trajectory using the
/bicycle_steering_controller/referencetopic:#!/usr/bin/env python3 import rclpy from rclpy.node import Node from geometry_msgs.msg import TwistStamped class CarlikeDriver(Node): def __init__(self): super().__init__('carlike_driver') self.publisher = self.create_publisher( TwistStamped, '/bicycle_steering_controller/reference', 10 ) self.timer = self.create_timer(0.1, self.publish_command) def publish_command(self): msg = TwistStamped() msg.twist.linear.x = 1.0 # Forward speed msg.twist.angular.z = 0.1 # Turn rate self.publisher.publish(msg) def main(args=None): rclpy.init(args=args) node = CarlikeDriver() try: rclpy.spin(node) except KeyboardInterrupt: pass node.destroy_node() rclpy.shutdown() if __name__ == '__main__': main()Make the Script Executable
chmod +x ~/ros2_ws/src/drive_carlike/drive_carlike/drive_node.pyRun the Script
Make sure your simulation is running, then execute:
ros2 run drive_carlike drive_nodeObserve the Carlike Robot in simulation
The carlike robot should move in a circle in RViz.
Modify the Script
Modify the script to make the robot move in a square wave pattern.
Tip: For more advanced trajectories, you can update the script to publish different velocity profiles over time.